Disclaimer- Similar content exists but this is mine and authentic.
Its always fascinating to see how cyber criminals run their infrastructure. The infrastructure they build has sometimes been state of the art which even surprises the law enforcement/intelligence communities with its sophistication and covert features and infact these people are always ahead at new technology adaption. My inspiration for writing this series came after reading about the Vault 7 leak that happened in March 2017. The leak details about malware infrastructure the CIA use which they call Hive and through this series, I will try to replicate the infrastructure as much as possible.
Lets start with the word Covert as GCHQ has a good definition for it. This definition is attributed to a leaked document from GCHQ’s CNE(computer Network Exfiltration) operations which states covert means” all CNE activity must be UK deniable” which in other words ‘the operator should have plausible deniability that the infrastructure belongs to them and have taken all the necessary steps to reduce the risk of infrastructure being attributed to them’.My plan for this series is to start with the very basics of building a malware infrastructure and slowly move into the covert part of it. I will be mostly working with cloud providers as they are cheap and reliable to play around with. Again disclaimer, this is for educational purposes only, and if you feel inspired to do something make sure to double-check whether you are legally authorized to do it.
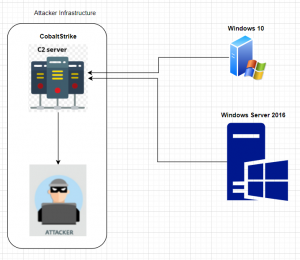
Let’s start with an easy setup. For our demonstration, I have deployed 4 cloud machines out of which two are Kali instances and the other two are Windows servers all in AWS. There is a ton of documentation out there on the internet on how you can deploy Kali & Windows in AWS. I have chosen CobaltStrike as my command and control(C2) server and the Windows 2016 server as the victim machine where we will be running our implants. Make sure you are comfortable with the following words as I will be using them regularly- C2, Implant, Redirectors, Beacons, Decoys, Listeners, etc.
The current setup we now have is as below.
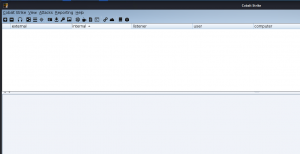
What the attacker have at his end is a contral panel by which he manages the victim machines and this is how the cobaltstrike’s control panel looks like.
Right, let’s dig down and see how we can install the Cobaltsrike C2. Like I said before I will have two Kali machines from the attacker’s side. One machine will work as a C2 server while other the other Kali will work as the attacker’s machine. You can download the trial version of Cobaltstrike from this URL. Download the Cobaltsrike into your C2 server(Kali) and extract it.

Making the Cobaltstrike work mainly involves running two executables. one is called ‘Teamserver’ and other is called ‘Cobaltstrike’. ‘Teamserver’ is the Cobaltsrike component that makes your Kali machine a C2 server and ‘Cobaltstrike’ executable is a client-side component that helps the attacker to connect to his C2 server. Remember the dashboard that I showed you earlier, that’s what we see when we run this executable. There is an option for the attacker to run both components from the same C2 server but we choose two different machines so as to enhance the opsec(operational security) from our side. Another opsec that we can do is edit the teamserver file and change the port number from 50050 to 8080. 50050 is the default port number over which the Cobalststrike teamserver listens over.
#gedit teamserver

We will change the port number to 8080. Make sure you open this port in was AWS firewall as well as the port 80.

Now let’s run the teamserver. Before running it please give the teamserver executable permission with chmod.
#Chmod +x teamserver
Running it involves a syntax as below.
#./teamserver <serverIP> <password>

Now our C2 server is up and the attacker can connect to this server from his other kali machine by running the ‘cobaltsrike’ executable.
#./cobaltstrike

Here the ‘Host’ is the IP of the C2 server, ‘Port’ is 8080, ‘User’ give any name you like and ‘Password’ is the password you gave when starting the teamserver.

This will pop up a nice dashboard in front of us.
Now let’s get into the next stage of this with generating an implant. The step first in this stage is creating a listener. The listener is a functionality within the Cobaltstrike that implants uses to communicate to C2. We also call it a beaconing process where implants send out beacons to it’s C2. So let’s create a listener first- Cobaltstrike–>Listeners.


Fill out the following- Name, HTTP Hosts, HTTP Host(Stager). Http host is usually our C2 server IP, and in the ‘Payload’ select ‘Beacon HTTP’. So whenever our implant wants to communicate back to our C2 server it will be using the HTTP protocol as the communication medium. In regards to opsec this is not great but let’s start with the very basics.

Now we have our HTTP Listener up and running waiting for beacons/callbacks from our implants. Now let’s move with generating implants.
Main Menu–>Attack–>Packages–>Windows Executable.
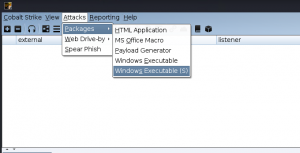
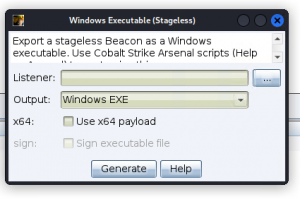
Select the already created listener and click ‘Generate’. This will produce a ‘.exe’ file and give it a name you like.
For our demo, we need to make this executable run somewhere in a Windows machine to see how the attacker uses the Cobaltstrike to control the victim’s machine. So in order to copy this into the victims’ Windows PC we will use Cobaltstrike’s in-build webserver which can be deployed with few clicks.
Main menu–>Host a file.

Fill out the following-‘File’, Local uri’, ‘Local Host’, and click ‘Launch’. The ‘File’ is the implant that we generated.

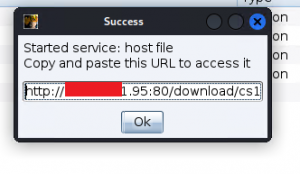
This will create a URL for us which can be copied and sent to the victim where he can download our implant and execute it.
On the victim’s side, we download the implant and execute it. We executed this in two Windows machines in AWS.

If we come back and look into the attacker’s machine we can see our dashboard populated as below.

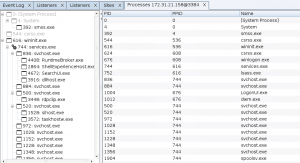
These are the beacons that we received back from our victim machines. We now have complete access to the victim’s network and can do all the nefarious activities we like. As a sample let’s take the processes running on one of the machines as well as the screenshot of the Desktop.
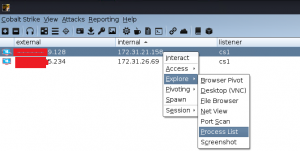
Processes running on the remote machine
Desktop screenshot

Simple as that. Anyway, let me sum this up. Cobalstrike is a powerful tool with enormous functionality and if I start blogging on that I will have at least 100 blogs to write. So let’s keep the Cobalstrike functionality to basic and let’s concentrate more on the other aspects of the infrastructure.
In my next blog, we will look into buying and configuring a domain for our C2 server along with implementing AWS CloudFront as our first C2 traffic redirector.
Thanks for reading and stay tuned.