If you haven’t read the first part of this series, I would greatly recommend to check it out.
Configuring the snort completely lies in changing the configuration setting in the snort.conf file. The configuration file is excellently documented and very easy to use. The default location of snort.conf file is ‘C:\Snort\etc’. ‘etc’ folder contains all configuration files. The configuration file is plain text and you can use any text editor to edit it, but recommend notepad++. A sample configuration file is given in the end of this document.
In order to customize the snort, changes need to be done in 9 steps.
1) Set the network variables.
2) Configure the decoder
3) Configure the base detection engine
4) Configure dynamically loaded libraries
5) Configure preprocessors
6) Configure output plugins
7) Customize your rule set
8) Customize the preprocessor and decoder rule set
9) Customize shared object rule set
Step 1
The network settings allow you to set Snort to monitor any range of networks. From a single IP address to several IP addresses in groups or individually, and entire IP subnets can be given in the snorts config. You can control the network range that Snort monitors by simply changing the var HOME_NET variable in the conf file. In our case, it covers the entire subnet as below.
Line 44-45
![]()
For external network addresses Change the declaration for EXTERNAL_NET to !$HOME_NET – this expression means the external network will be defined as any IP address that is not part of the home network. For our configuration, it works as below.
Line 47-48
![]()
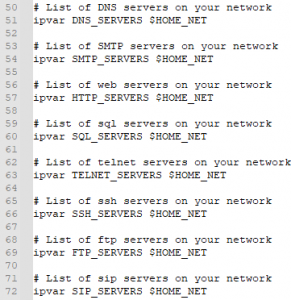
Generally speaking, you can leave unchanged all the other server declarations. In our scenario, the following servers were identified and listed in the correct variables.
Line 50-72
For Snort to detect attacks it needs to know where its rule base is. By default, the rule base is in ‘c:\Snort\rules’. In line 104, you can define this variable and for our configuration, we have kept it to the defaults.
Line 103-104
![]()
change the PREPROC_RULE_PATH to match the appropriate directory location on the system, such as c:\Snort\preproc_rules. We keep the default location as below.
Line 106
![]()
Next comes the reputation preprocessors. The reputation preprocessor is a relatively recent addition to Snort that allows you to configure trusted or untrusted IP addresses using separately referenced files that list the addresses (whitelist for trusted, blacklist for untrusted). If you intend to enable the reputation preprocessor then the path to the whitelist and blacklist files needs to be provided at the end of the step.
Line 113-114
![]()
Please note: if you leave the reputation preprocessor enabled, you must create the whitelist and blacklist rules files referenced in the preprocessor configuration, or Snort will generate an error and fail to start.
Step 2
This step mainly deals with the decoder configuration. We can leave this step for default configurations as it works best. At the end of this section, there is a configuration setting to indicate the default directory where Snort logs should be written. Comment out this line by deleting the # character in the first position and editing the line to include the ‘c:\Snort\log’ default directory path. In our case, it also looks something similar.
Line 186
![]()
Also, include the ‘show_year’ variable to have the year in the log file.
Line 187
![]()
Step 3
This part deals with the base detection engine settings and is good with its default settings. These settings are used for performance tuning and reflect memory and processing capabilities.
Step 4
Change the dynamically loaded library path references to reflect their location in Windows. Snort references these locations and loads the libraries at start-up. Loading the dynamic libraries requires Snort to write to the Windows registry, an action typically requiring administrator privileges. For this reason, the command shell should be launched with the “Run as administrator” option from the Windows start menu when preparing to start Snort.
The declaration ‘dynamicpreprocessor directory’ points to a directory while ‘dynamicengine’ directive points to a ‘.dll’ file.
Line 248-249
![]()
Line 251-252
![]()
we are not going to use dynamic detection. Therefore we comment out (put a # in the first position in the line) the dynamicdetection directory declaration.
Line 254-255
![]()
Step 5
This step deals with configuring preprocessors. You use preprocessors to perform certain actions before a packet is operated by the main Snort detection engine. Each preprocessor has a separate readme file with configuration options and settings documented in it. so if you want to use a particular preprocessor, you should consult those files or the Snort manual to make sure you set them up properly. Be aware that there are many, many preprocessors for use with Snort, and you very likely will not want or need to have all of them running. For our environment, the following changes were made.
Since our deployment is not using the snort in IPS mode, Comment out (put a # in the first position on the line) all the rows in the Inline packet normalization preprocessor directive.
Line 265-271
![]()
Another configuration change required is in creating the whitelist and blacklist files corresponding to the references in the configuration settings for the reputation preprocessor, which is at the very end of this step.
Line 509-515

The rest of the preprocessor configs are left with default settings.
Step 6
Output settings are very important in Snort, for they define how Snort’s information will be presented to you. Typically, only one of the output plugins is used with Snort at any one time. For our environment, we go with the fast alert mode with alerts dumped to a CSV file.
Line 533
![]()
Comment out the metadata reference lines at the end of this step.
Line 537-539
![]()
Step 7
This step mainly focuses on the rules you want snort to analyze the traffic on. There are community rules, Subscription rules and also the custom rules that we make for our environment. Community rules include free rules submitted by members of the open-source community. These are free and available to all snort users. Subscription rules are available for only paid users and cover more advanced rules for detection.
If you choose to use the community ruleset instead of a registered or subscriber release, you need to comment out all of the include statements in Step #7 except for community.rules and add an include statement for community.rules (the community ruleset has all rules in a single file).
Line 551
![]()
If you create your own rules in separate rules files (instead of adding them to local.rules), add an include statement for your custom files following the same syntax you see for all the other statements.
Step 8
This step includes rules that are configured for the preprocessors. For our default settings, we uncomment the first three lines as shown below.
Line 663-666
![]()
Step 9
The rules referenced in Step are shared object rules. Because shared object rules are not well supported on Windows, leave all the shared object rules commented out in this step.
For our environment we need to leave the include threshold.conf statement uncommented.
Line 696![]()
A sample configuration file can be found here- https://github.com/jabriyel